Reviews, Fitness, Tips, DIY, and Life Hacks

A Practical Roof Cleaning Solution for an Ugly Roof

As an Amazon Associate we earn from qualifying purchases.

The Ugly Roof! (May 29,2009)

This blog is geared toward practical solutions like creating a squirrel proof bird house, fashioning an under deck water drainage system, or insulating shed doors. Well, I have another one, a roof cleaning solution, for you with this article.

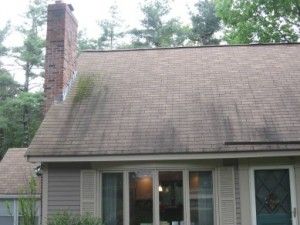
We had a new roof done on our house approximately ten years ago and, for a long time, it looked great. As the years went by, it started developing streaks and black mold on the roof shingles on the shady side of the house.

Understandably, I was concerned that we’d have to have our roof replaced. Up to this point, I hadn’t really heard of roof cleaning services. The most unnerving thing was that we were told that it should last at least 20 years.  So, I made it a point to start looking at other houses in my town and I saw roof mold, roof stains, and roof algae on many homes.  I remember distinctly, as we backed out of our driveway one day, my eldest daughter exclaimed, “Our roof looks horrible!”  And I agreed, wholeheartedly.

How to Remove Mold

So, I made it my mission to start doing my research on how to get rid of black mold on my roof.  I discovered that the build-up of dirt, mildew, black mold, fungus, and moss is prevalent especially on the roof on the shady side of a house.  I also discovered that there is a product for roof cleaning called Shingle Shield Roof and Deck Cleaner that, when applied with a pump sprayer, and hosed off, will remove these streaks from your roof.

Now the big problem was, to remove these streaks, you had to apply the diluted solution of the roof cleaner, directly to the roof!  And it basically required you to get onto your roof.  My wife had no desire to become a widow, so I ended up calling my chimney professional that cleans my chimney once a year.

He really didn’t know about the product and I thought that this could be another source of revenue for him.  He was interested in doing the job, so I purchased the product online and set up an appointment for him to apply the product to my roof.

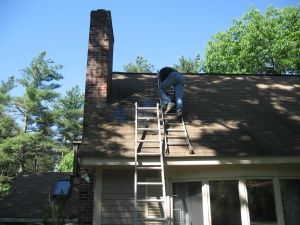
He had the proper ladders to get up to the roof and had a special roof ladder that hooked over the ridge of the roof.  Prior to heading onto the roof we made it a point to cover all the bushes with plastic, even though the product is advertised as being non-toxic to plants.  I just thought it would make sense to cover them, just in case.

He then applied the product with a pump sprayer directly onto the streaks first.  Then he applied the solution to the whole roof by moving his roof ladder along the face of the roof.


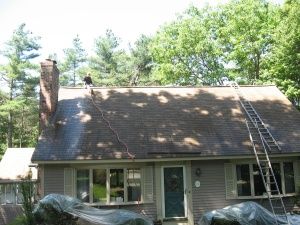
After applying the solution to the whole roof, I handed him the lawn hose and he went up to the ridge of the house and sprayed off the solution with the garden hose.  He simply moved from one side of the roof to the other and thoroughly hosed down the roof.  You could see the stains disappear almost immediately.

After doing the initial application, you may have to go over individual streaks with a soft brush to get the really dark streaks totally removed. Cleaning roof mold takes some work and elbow grease if you want it entirely off of your roof.

How to Get Rid of Mold Forever

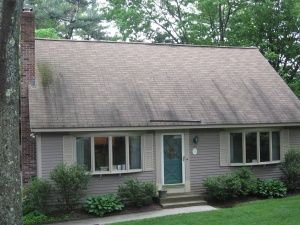
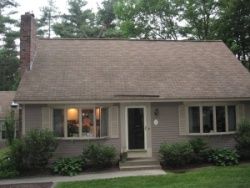
One final step, if you do not want these streaks to return, is to have your roofing specialist apply zinc strips under the shingles at the ridgeline of your roof.  This should prevent the black mold and fungus from returning over time.  You can find these zinc strips on the website mentioned earlier in the post.  As you can see from the before and after photos below, this stuff works! (Please check the updated photo of how it looks two years later.)

Instead of paying big bucks for a new roof, consider roof cleaning products and give your roof a makeover.  For a few hundred dollars you’ll be able to look at your house with pride again.

(Updated on August 21st, 2011)

 
No black mold two years after roof cleaning
As of August 21, 2011

This is how my roof still looks more than two years after the roof cleaning and the zinc strips were applied! There are still no signs of black mold or green fungus. This was one of the smartest home upgrades I ever did to my house and the cost was minimal.

Now when I drive around other neighborhoods in my town where there are houses much bigger than mine, I am even more proud of my roof cleaning project. It is amazing to me how ugly even the most contemporary houses look when their roofs have black, green, and even purple streaks. If you have a similar problem, look into roof cleaning in your area. The green fungus and black mold on your roof will just be a distant memory!

32 thoughts on “A Practical Roof Cleaning Solution for an Ugly Roof”

  1. hi bob,

    this is a game of spot the difference lol!!!!

    quick question did you paint the doors too or was it left open?
    it’s amazing how much we would save when we look out for alternative products/solutions to meet our required needs.This reminds me of jens guets post on your blog a while back.
    I can also tell from the post that you are a happy man from this exercise
    Take care
    .-= ayo´s last blog ..I Am A Victim Of Gossip =-.

    Reply
    • Hi Ayo,
      I just noticed what you are referring to. No, the door was just left open. I love doing DIY stuff and I’m hoping to add a lot more to these pages. I am also an avid woodworker so I could impart a little wisdom there as well. I am a happy man. You are correct!

      Best,
      Bob

      Reply
  2. Wow! Bob, what a difference indeed. And I think you SHOULD be affiliating the product – you are clearly happy with the results!

    I have a leaking roof at the moment and cannot find a roofer to fix it for love nor money. I wish you lived this side of the pond – I’d have you come and give me some advice! Your enthusiasm for your DIY here is palpable!

    Lovely!
    .-= Christine Livingston´s last blog ..How to make sure you never get ahead =-.

    Reply
    • Hi Christine,
      Yes, I agree that I should be affiliating this product but I’m not sure if they have such a program. That is a shame about your roof. It is my guess with your way with words you could coax someone to come out for an estimate. 🙂
      I know this topic is not exciting to most but practicality sometimes isn’t sexy.. Great job again with your latest post. You might end up calling that your pillar post! If anyone is reading this comment, I’m going to go against the cardinal rule of all bloggers (to never direct a reader to another blog) and direct you to Christine’s latest post How to make sure you never get ahead. I know you can also see it in the CommentLuv link.

      Best,
      Bob

      Reply
  3. Thank you so much for your informative blog. This was exactly the kind of info I was looking for. I’m now waiting to get an estimate from a chimney sweep company. One quick question on the zinc strips. How are they secured under the shingles? Do they stick out and show after installation? Thanks again.
    Janet F.

    Reply
    • Hi Janet,
      Thanks for reading. I did not secure the zinc strips as my roofer did it for a reasonable price. I think all he did was place the strips under a row of shingles and then re-secured the shingles with a couple of shingle nails and there is also the tar underneath the shingles that will also help secure the strips. They do show but it is not bad. My shingles were already brown so the zinc blended in with the roof. Look at my pictures and click on them to make them bigger. You hardly see them in the pics.

      Best,
      Bob

      Reply
    • Hi Janet,
      I still had some zinc strips left so I am going to write out the directions on the box:
      1. Roof must be cleaned using Shingle Shield Roof and Deck Cleaner prior to installation of the Shingle Shield zinc strips.
      2. Beginning from either end of the roof peak install a continuous single row under the first available course of shingles below the ridge line. To allow for thermal expansion leave a 1/8″ gap between each section or just overlap them slightly.
      3. Simply slide one Shingle Shield up under the shingle until its built-in alignment guide butts against the edge of the shingle.
      4. Once aligned, raise shingle tab, locate the pre-punched hole and nail into place using a high quality hot dipped galvanized roofing nail. note; A dab of roofing cement over the nail will ensure a watertight seal (wood roofs should use a neoprene washer head nail).
      5. Repeat the process along the roof line until the row is completed. Note: for persistent problems, severe conditions, or slopes greater than 20 ft., install a second row midway down the roof slope.
      6. Additional Shingle Shield pieces should be placed below dormers, chimneys, or any other obstruction which blocks the flow of rainwater from the ridgeline.

      FYI, we only put one row just below the ridgeline and it has worked well for us with no additional staining problems and never added any pieces below our chimney and still no problem.

      I hope this helps!

      Best,
      Bob

      Reply
    • Hi Paul,
      Sorry for the delay in responding but it took almost 3 years for the black streaks to start showing up again. We have since moved from this home but I would definitely recommend using the product to remove the mold and the zinc strips to prevent it from recurring.

      Best,
      Bob

      Reply
  4. I have read your post. Thanks for such a nice post, It’s really informational.

    I think leaving the moisture in the material is just making it more likely that the mold will return. In fact, the atmosphere around the affected area needs to be petitioned. If the carpet or furniture is left engaged in a damp area the mold will ultimately return.

    Reply
  5. This home solutions for roof cleaning looks promising. Roof actually becomes ugly over the time so it must be get cleaned time to time. I really appreciate this solution you shared here with us.

    Reply
  6. Bob, nice share. I really enjoyed reading and learning some effective ways to clean an ugly roof. I’ve not cleaned my house roof for 2 years and now I think I should clean it by following the ways you’ve mentioned.

    Reply
  7. these are valuable information to keep home beautiful. roof cleaning is must with mold roof look so ugly. I have never know that we can remove mold from roof for forever. i will share the tips for my roofers. Thanks for sharing !

    Reply
  8. Thanks Bob for your valuable info.You’re sharing is just outstanding.Your tips are truly useful to comprehend the significance of roof cleaning.A perfect roof cleaning needs to require some genuine endeavors and thought to decide the best result. I was essentially puzzled on picking the best roof cleaning methodology which could work viably for me.Even attempted an alternate online inquiry however I failed.I discovered your article all the more fascinating and valuable as an instrument which could enable me to work effectively for my roof cleaning arranging thoughts in this area.

    Reply
  9. This Shingle Shield Roof and Deck Cleaner is the second time we have used this product and the second time we’ve been delighted with the results!!

    Reply
  10. Oh wow, I’m interested in the mold product remover! I’m thinking of doing it myself. But the way you describe it, it seems like a job for at least two people haha. So I’ve gotten in contact with a roofing contractor in my area and I’m still waiting on their recommendations for my roof regarding the mold product remover and the zinc strips. The guy at Roofing contractor Scanberra told me they can apply the mold remover for me for no charge if I hire them to apply the zinc strips. But I’m really curious, what’s your update on your roof? Do the zinc strips work even after all these years or did you need to replace them at some point? Regardless, thanks for your recommendations!

    Reply
    • Hi Marianne,
      I cannot say for sure at this point as we moved 4 years ago. I do drive by the old homestead when I am down in that area so next time I’ll check out the roof! Good luck and it worked awesome for me!

      Thanks,
      Bob

      Reply
  11. The outcome of your roof looks fantastic! It is indeed a practical solution for self-cleaning roof. Save you so much and you can really see the difference. Thank you for sharing this amazing idea!

    Reply

Leave a Reply to Bob Bessette Cancel reply

This site uses Akismet to reduce spam. Learn how your comment data is processed.

STAY CONNECTED

Sign up for Updates

We respect your email privacy

Java Time

Most Popular Articles

Sign up for our Newsletter