As an Amazon Associate we earn from qualifying purchases.
If you’re interested in creating a built-in shelf for your shed, I came up with a design for a shelf that fits in-between the studs. I hope you can utilize this technique on your own to build a shelf designed for lighter objects.
You can also reinforce the shelf for heavier objects. Don’t miss my detailed video below that shows you everything from soup to nuts!
Key Takeaways
- Preparing the shelf involves cutting a piece of T-111 to size and marking areas for the studs.
- Cleats are installed to support the shelf and ensure it sits level.
- The shelf is secured in place after ensuring all components fit and align correctly.
I’m in my shed today, and my project is to add a shelf just above my workbench, positioned within the studs. I’ve already cut a piece of T-111 to the needed length and marked areas where I’ll cut for the studs. This shelf is designed to fit flush against the wall once these cuts are made.
I’m using a 40-inch piece of 2×4 to ensure the shelf sits level. After securing the cleats on each side of the stud, these will support the shelf. I’ll start by cutting out the rectangles needed for the shelf to fit snugly, then secure the cleats using a nail gun, ensuring everything aligns perfectly before finalizing the installation.
YouTube Video – Shed Shelving | DIY Built In Shelf
Preparing the Workshop Area
Setting up the workshop for this project involves several key steps. First, ensure that the workspace around the workbench is clear to allow for easy movement and access to tools. Safety is essential, so make sure you have safety glasses, ear protection, and gloves readily available.
To begin, gather all the necessary materials: a piece of T-111, a 40-inch 2×4, cleats, a brad nailer with nails, and a saw. Ensure that your tools are in good working order.
Next, secure the T-111 on a sawhorse outside to make the required cuts. This will help the piece fit snugly between the studs once inside. After cutting, take the piece inside to test the fit and make any additional adjustments.
Once the T-111 fits correctly, it’s time to attach the cleats. Use a 40-inch 2×4 as a guide to ensure that the cleats are at the correct height. Clamp the 2×4 in place to keep it steady.
Secure the cleats using a brad nailer. Ensure all cleats are fastened at the same height to create a level surface for the shelf. See images further down for a pictorial view.
Checking for level is important for a professional finish. Using a level, verify that the cleats and shelf are even. Make any necessary adjustments before securing the shelf permanently.
Once satisfied with the fit and level of the shelf, secure it by attaching it to the cleats with brad nails. This will create a stable and secure shelf above your workbench, perfect for storing tools and materials.
Trimming the Shelf to Fit
Ensuring Accurate Stud Cut-Outs
I marked the areas on the T-111 panel for the stud cut-outs. These notches will allow the shelf to fit securely into the wall studs, creating a seamless appearance above my workbench.
Fixing T-111 for Precise Trimming
I positioned the T-111 on a sawhorse to stabilize it for cutting. Using clamps ensured that the panel stayed in place while I worked with the jigsaw.
Using a Jigsaw to Make the Cuts
With the T-111 secured, I used my jigsaw to make precise cuts for the stud notches and trimmed an additional 1.5 inches from the end to accommodate the corner stud. This allows the shelf to fit snugly and align perfectly with the wall.
Installing the Shelf
Initial Dry Fit
First, I placed the cut piece of T-111 onto a sawhorse outside for easy cutting. I cut out the necessary rectangles to fit around the studs using a jigsaw. This initial dry fit showed that the piece fits snugly within the shed studs, but it was slightly higher than desired. To correct this, I marked and cut an additional 1.5 inches from one end to accommodate the corner stud and ensure a flush fit.
Adjustment for Corner Stud
After discovering the corner stud, I made a precise cut of 1.5 inches to ensure that the shelf would fit correctly. I then tested the fit and confirmed that the piece was now snug in the corner. This careful adjustment ensured that the shelf would align properly with the studs once installed.
Ensuring a Snug Fit
To ensure the shelf would be secure, I used a 2×4 as a spacer and secured it with a clamp for accuracy. I then attached cleats to the shed wall, ensuring they were at the correct height. These cleats, set three inches high, supported the shelf. I used a brad nailer to fasten the cleats to the studs, adding screws for additional stability where necessary. Once all cleats were in place, I laid the shelf on top and secured it with more brad nails to complete the installation.
Installing the Shelf Supports
Setting Cleat Height Using a Spacer Board
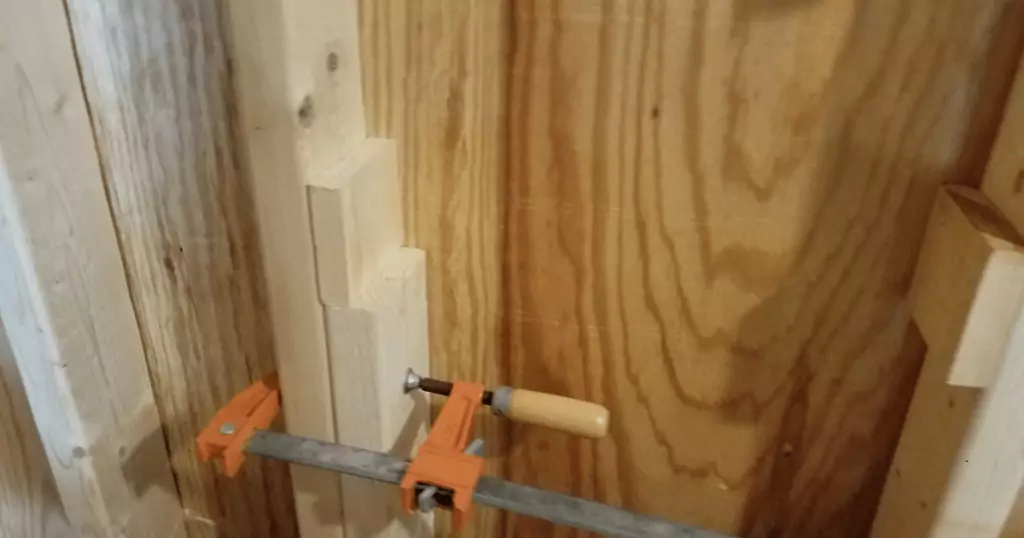
To ensure the perfect height for the cleats, I used a 40-inch 2×4 as a spacer. First, I clamped the 2×4 next to the stud where I’d be working and made sure it was level. With the spacer in place, I knew exactly where to position the cleats for a consistent height across the shelf.
Attaching Cleats with a Nail Gun
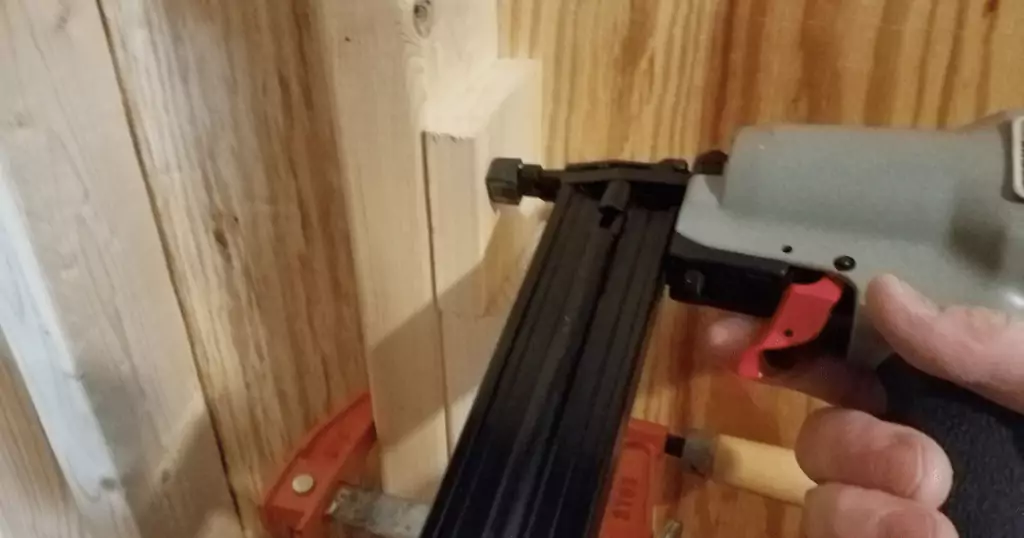
Next, I secured the cleats using a brad nailer. These cleats, each three inches high, would support the shelf. I started at one end, nailing two cleats together for extra support, and then worked my way down, nailing single cleats to either side of each stud. The brad nailer made the job quick and efficient.
Adding Double Cleats at the Ends
At the ends of the shelf, I doubled up the cleats for added strength. This meant placing two cleats side by side at each end of the shelf. This extra reinforcement helps ensure that the shelf remains stable and can bear extra weight.
Handling Stud Spacing Issues
I encountered some challenges where the studs were spaced too closely. In these cases, I had to angle the nail gun and occasionally leave nails slightly exposed before hammering them flat. Adjusting the cleats to account for these spacing issues ensured a snug fit and even support along the entire length of the shelf.
Completing the Shelf Installation
Positioning the Shelf on Supports
I carefully aligned the shelf onto the cleats to ensure it fit snugly into the spaces I had cut for it. Checking for accuracy was crucial to make sure the shelf would rest level and flush against the wall. Once everything was positioned correctly, I was ready to proceed with securing the shelf.
Verifying Level and Fastening Shelf
To confirm the shelf’s level, I placed a level tool on it and checked the bubble to ensure it was centered. Using my brad nailer, I then affixed the shelf to the cleats at multiple points along its length. This step was essential to ensure the shelf would remain stable and provide a reliable surface for storage.
Extra Fastening and Finishing Touches
For added stability, I reinforced some areas by adding extra nails or screws. Additionally, I framed out sections around the shelf for a more polished look. Any remaining gaps or unfinished areas were addressed to ensure the finished product was neat and secure.
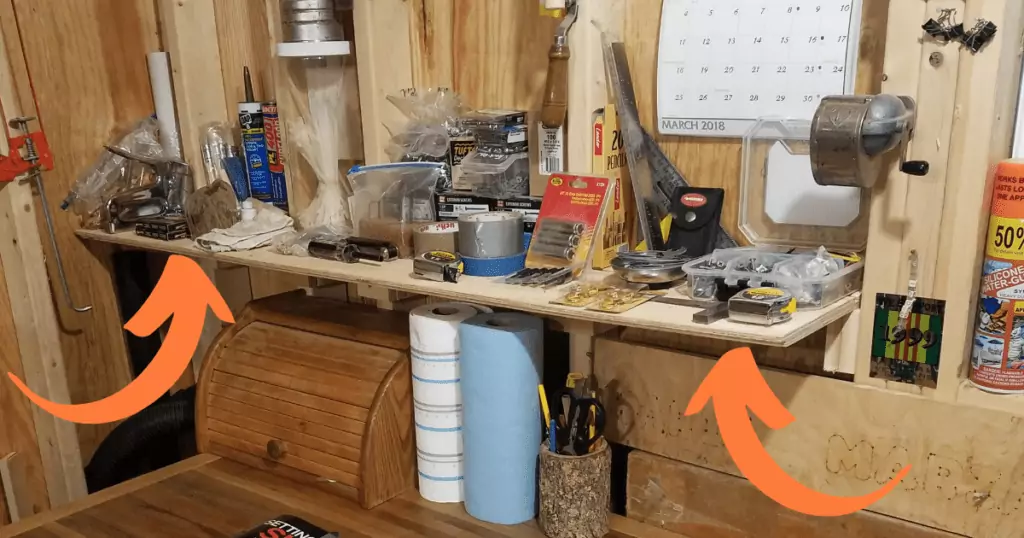
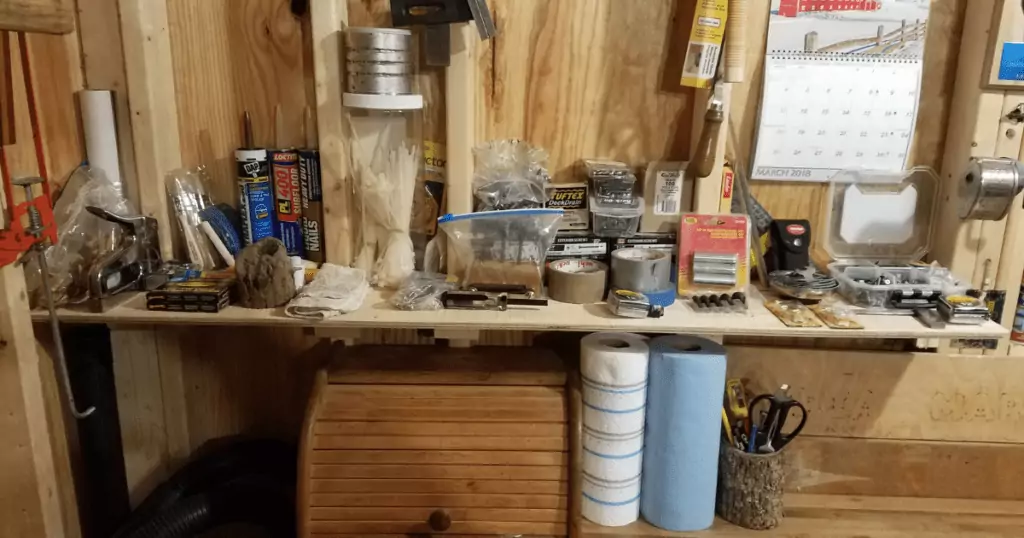
Final DIY Built In Shelf – Front View
Here’s a look at my shed shelving project loaded up. Please be aware, this should not be used to hold heavy items and is perfect for lighter items such as boxes of screws, electrical tape, small tools, tape measures, etc.
I hope this article and especially the video helps you out if you want to build shelving in your own shed or basement that has exposed studs.

